If you’re serious about having a successful online store, Google Analytics should be an essential tool in your arsenal. Over 35 million live websites use Google Analytics, and another 38 million sites have used it historically.
The reason?
Integrating Google Analytics directly into your WooCommerce store lets you keep track of visitors and collect more actionable data. That lets you gain insights into customer behavior and marketing successes and enhance your store’s performance.
If you want to take advantage of Google Analytics, keep reading. We’ll get you up to speed on how to integrate Google Analytics into your WooCommerce store and its benefits.
- Benefits of using Google Analytics for WooCommerce
- How to set up Google Analytics on your WooCommerce website
- Setting up the WooCommerce Google Analytics Integration
- Testing your analytics
- Final thoughts: How to add Google Analytics to WooCommerce
Benefits of using Google Analytics for WooCommerce
Google Analytics is a powerful tool that can help you grow your business, especially if you know how to take advantage of its unique features.
Google Analytics enables you to:
- Collect more valuable and actionable customer data — Track and compare organic with paid traffic, abandoned cart data, and measure conversion and bounce rates. You can also generate ecommerce tracking reports, such as best-selling products, to identify the most valuable customer segments.
- Identify what’s working and what isn’t — Suppose you’re running Google Ads and aren’t seeing any results. You can use Google Analytics to test and optimize ads to get better results from your store.
- Monitor and evaluate your ecommerce store performance — Do this directly from your Google Analytics dashboard.
- Identify the best sources of traffic — Since it monitors both organic and paid traffic, Google Analytics will help you locate the most lucrative traffic source to focus on. Google Analytics will also compare mobile versus web traffic and help you to optimize your website for responsiveness across all devices.
- Combine with other analytics tools on your site, like Meta Pixel (formerly Facebook Pixel) — The more data you have about your customers' behaviors, the better it is for your business. Google Analytics can also collect data that other analytics tools can’t, filling in any data gaps you may have.
There are always more benefits to Google Analytics — depending on your specific ecommerce business. But to experience these advantages fully, you’ll have to add Google Analytics to your WooCommerce store.
How to set up Google Analytics on your WooCommerce website
Before going any further, do you have a Google Analytics account? If not, setting one up is pretty straightforward.
Since GA is a Google product, you only need an active Gmail account. Additionally, since 2020, any new Google Analytics accounts start with Google Analytics 4 (GA4) by default.
If you’re a beginner, here’s a quick Google link to get you started.
There are several ways to connect Google Analytics with WooCommerce. Let’s explore them.
Using the native WooCommerce plugin
You can connect Google Analytics to WooCommerce directly. To do so, you can use the WooCommerce Google Analytics plugin, which has both free and paid versions.
Let’s check them out.
Free WooCommerce Google Analytics plugin
Even with the free version of this plugin, there are plenty of tasks you can perform. With its Universal Analytics, you can track site visitors and events, including:
- Products added to the cart.
- Products removed from the cart.
- Checkout completed.
You can also exclude site admins from being tracked by Google Analytics, and it even supports display ads.
Premium WooCommerce Google Analytics plugin
The paid version offers an extended experience, eliminating your need for any additional Google Analytics plugins.
You can track enhanced customer behavior and events, including:
- Billing email added.
- Coupons added or removed.
- Customer registration.
- Customer checkout behavior.
You can also enable Google Optimize, which lets you A/B test ads. It also supports enhanced link attribution, enabling you to track your best-performing links.
Using MonsterInsights
You can also use MonsterInsights, another popular analytics plugin for WordPress websites. Like the WooCommerce plugins above, you can choose between the paid and free versions.
MonsterInsights is also pretty popular among WordPress users — with over 3 million active installations and a four-and-a-half star rating.
So, what does this plugin offer you?
A central dashboard gives you access to all the settings and features of the plugin. It has an intuitive interface you can configure and get used to fast.
MonsterInsights automatically makes your store GDPR and CCPA-compliant, alongside other privacy regulations worldwide.
MonsterInsights can track:
- Forms.
- Single product pages.
- File downloads.
- Scroll events.
- Logged-in users.
- Categories.
- Media.
- Custom events and metrics.
- Affiliate links.
- Conversion rates.
The plugin tracks these events across multiple devices. You can also export your data into PDF documents and review them at your convenience.
Setting up the WooCommerce Google Analytics Integration
For this tutorial, we will use the free WooCommerce Google Analytics plugin. Here are the steps to follow:
Step 1: Install and activate the WooCommerce Google Analytics Integration plugin
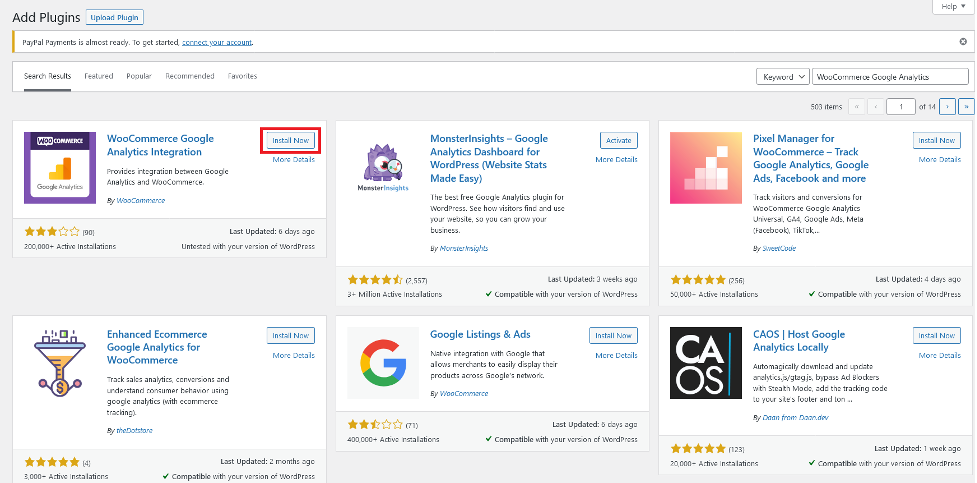
From your WordPress website admin dashboard, click plugins from the sidebar menu. Then, select add new. This option takes you to the plugin section of WordPress. In the search box, type the following keywords: WooCommerce Google Analytics.
You’ll see the plugin in the search results. Click install.
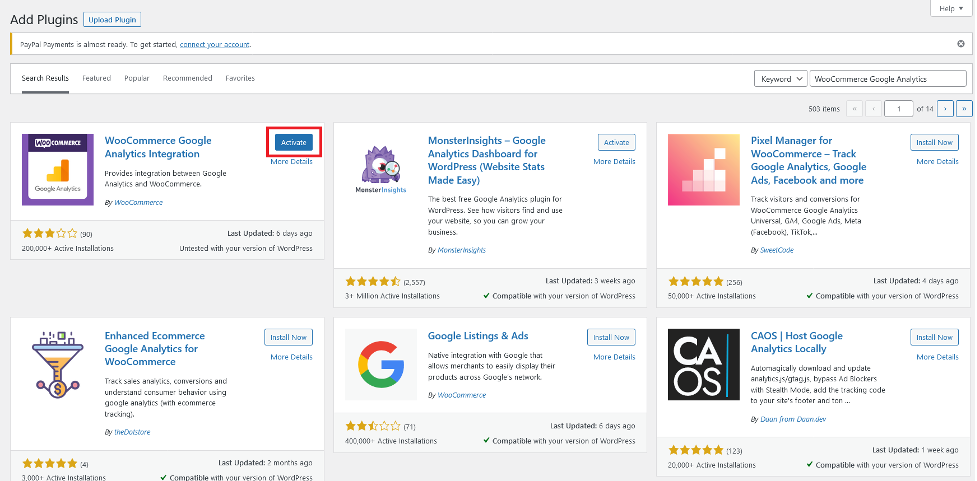
After installing the plugin, be sure to activate it.
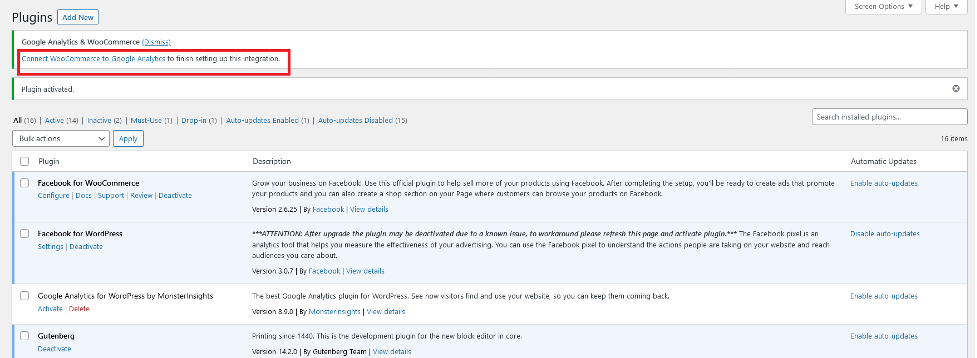
Once activated, the plugin will prompt you to connect your WooCommerce store to Google Analytics. Click on it to complete the setup process.
Step 2: Get your Google Analytics tracking ID
For this step, you’ll need the Google Analytics account you created earlier. To locate it:
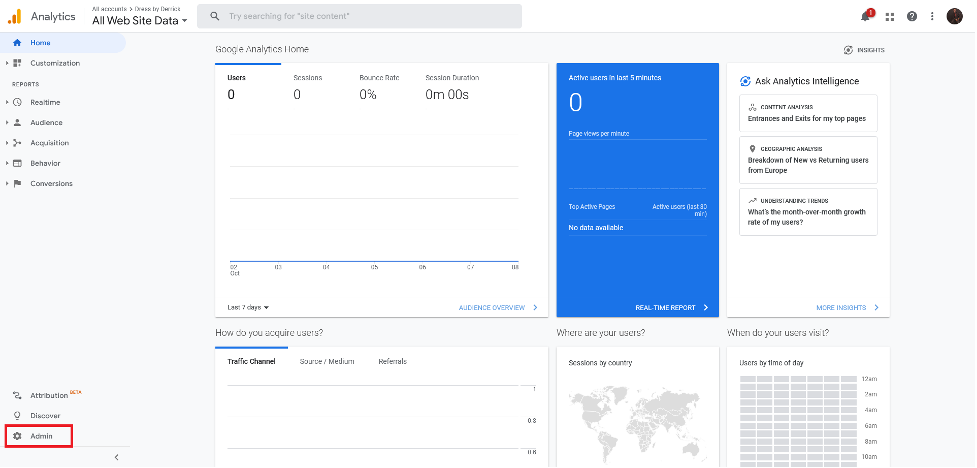
- Log in to your Google Analytics account to access your admin dashboard.
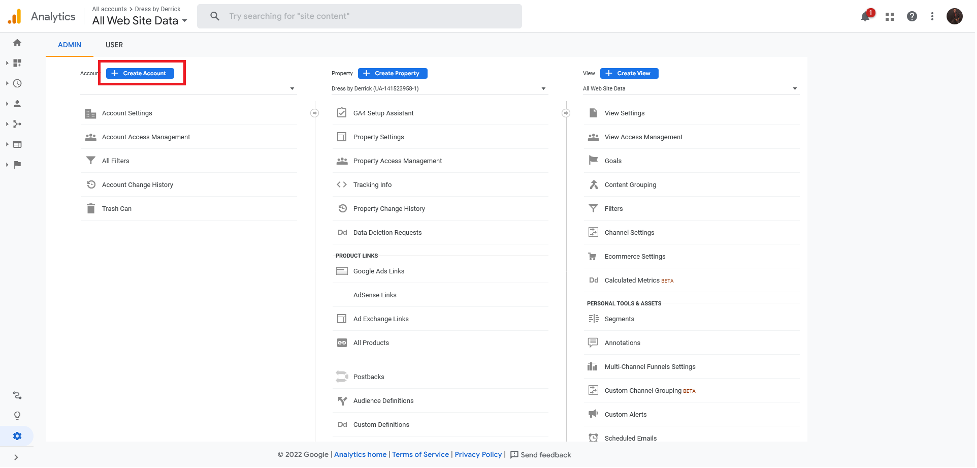
- Go to the bottom-left corner of your dashboard and click admin.
Depending on your exact business goals, you may only need to create a new property. In this case, we’ll create a new account. To do that, click on create account.
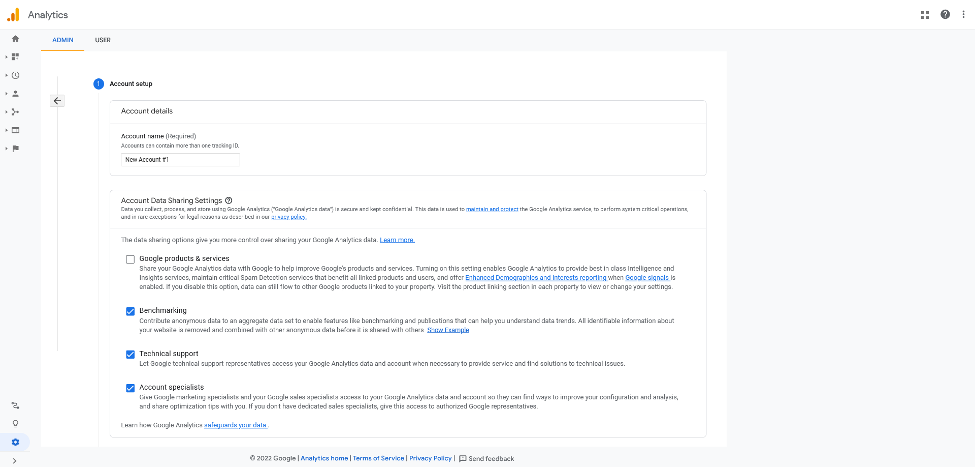
To proceed, name your account and create a new property.
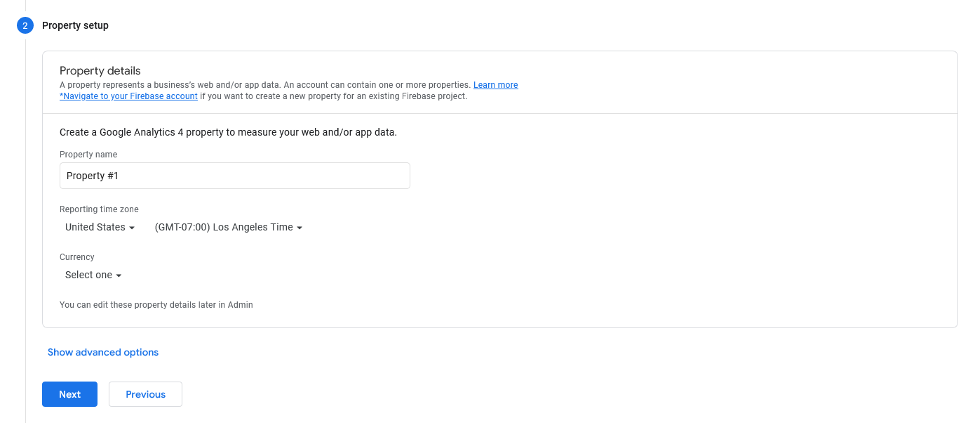
Name the property, select a currency, and click next.
Google will ask for more details about your business to help you optimize your analytics better. Choose whatever applies to your business.
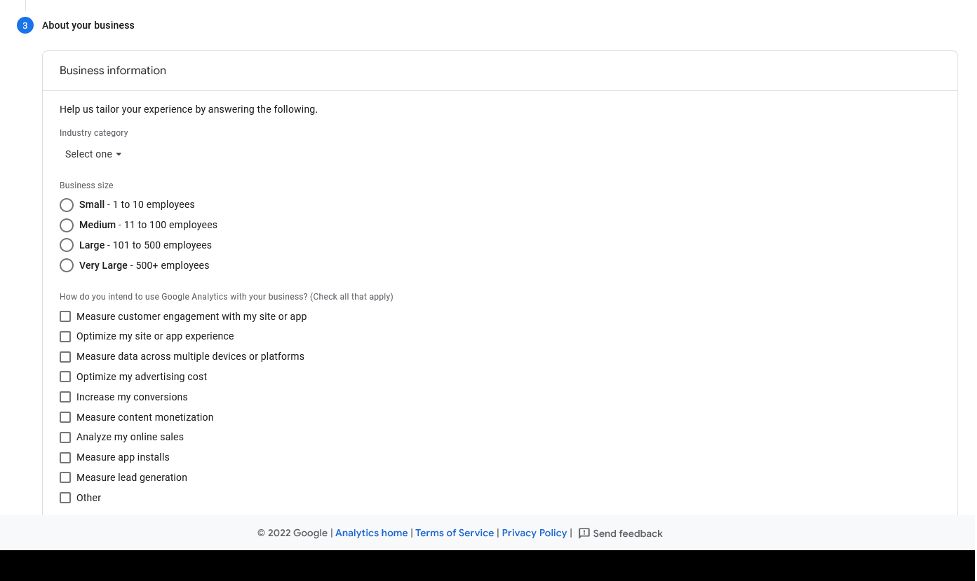
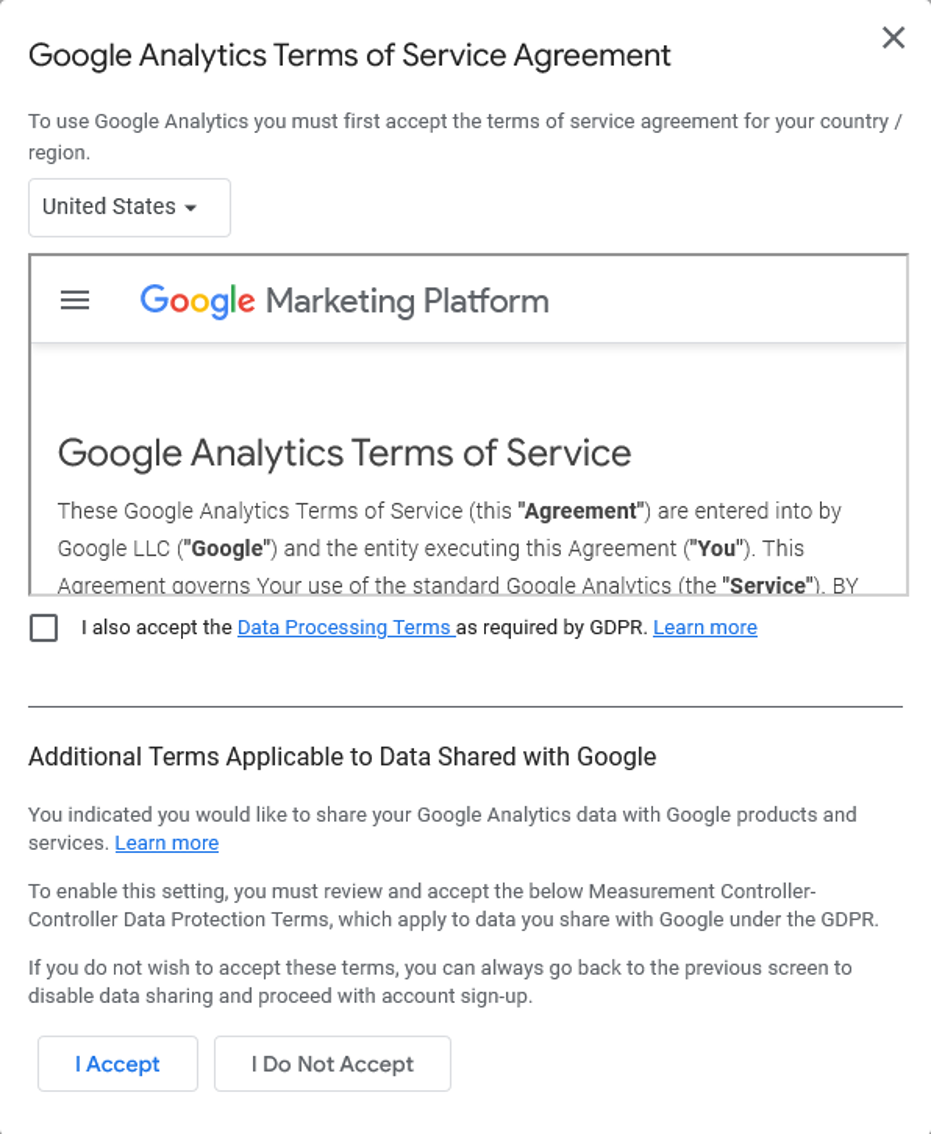
Once completed, click next. You’ll have to acknowledge and accept Google’s Terms of Service Agreement based on your country and region.
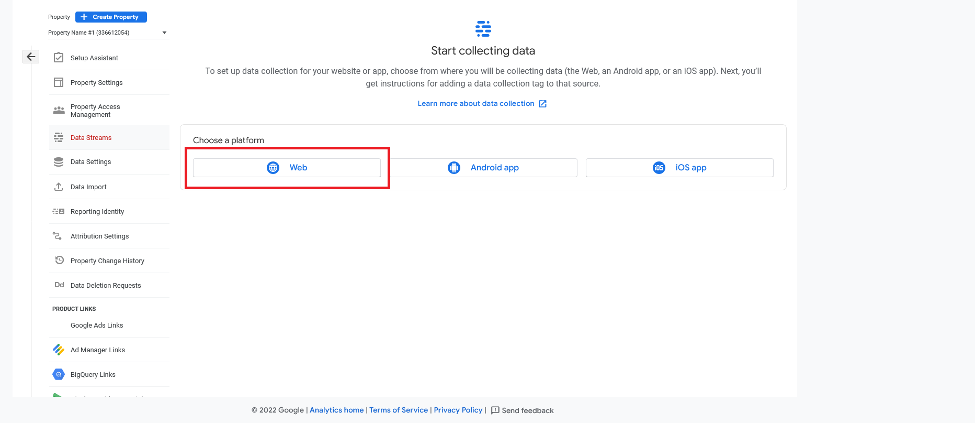
After you clear this stage, you can start collecting data. But first, select the ideal platform. You can choose between the web, iOS, or Android. Since WooCommerce is a web app, choose web.
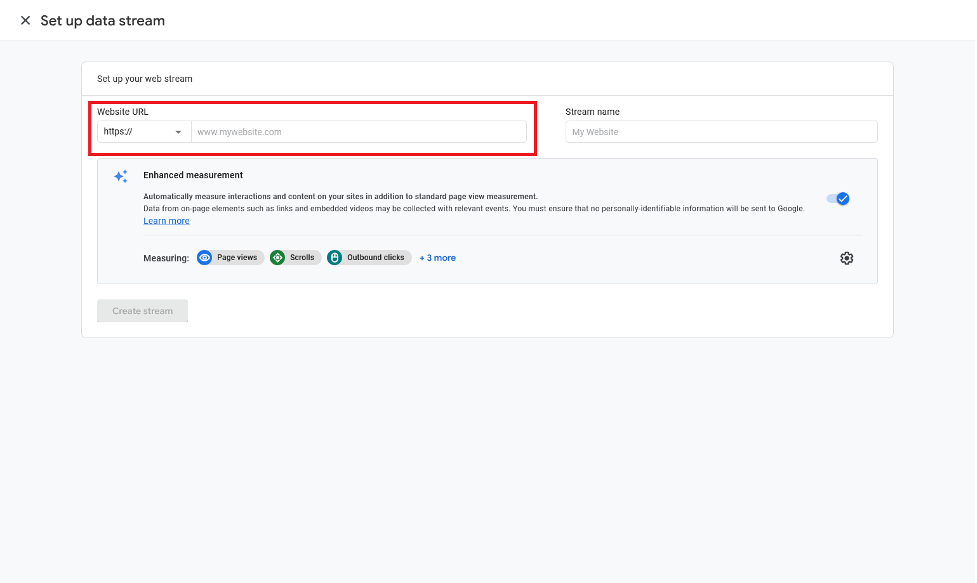
Google will prompt you to set up a data stream. Here, add your website’s URL to the dialog box. You can also add a name under stream name.
Once you add these details, Google will generate the web stream details alongside a tracking ID.
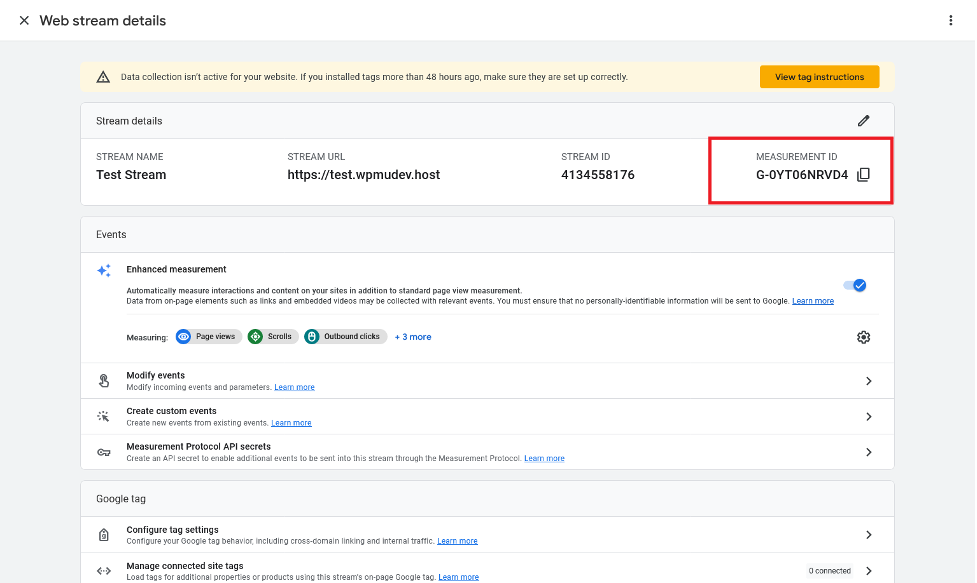
Copy the measurement ID. Then, go back to WooCommerce and paste it into the Google Analytics Tracking ID box.
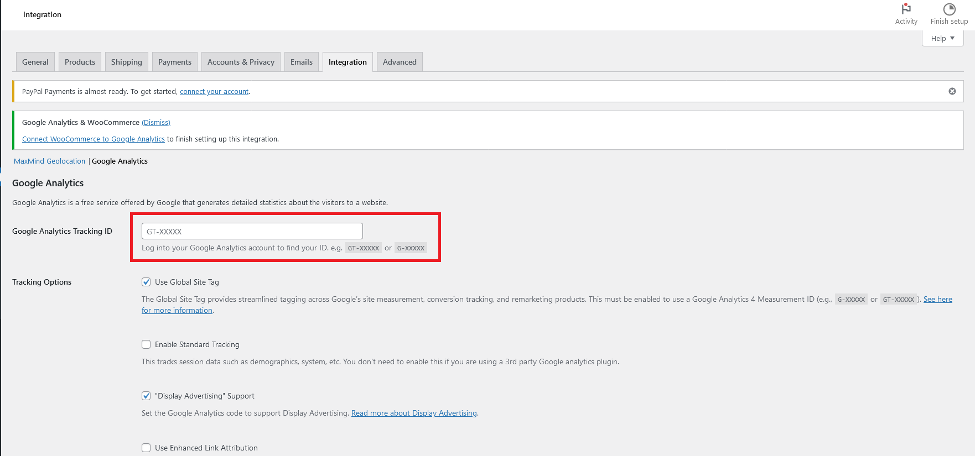
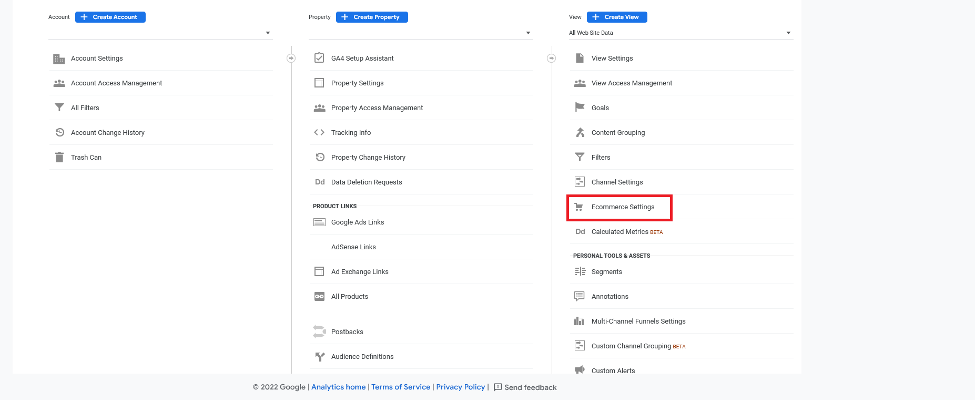
Step 3: Enable ecommerce settings on your Google Analytics account
From your online store Admin dashboard, select ecommerce settings.
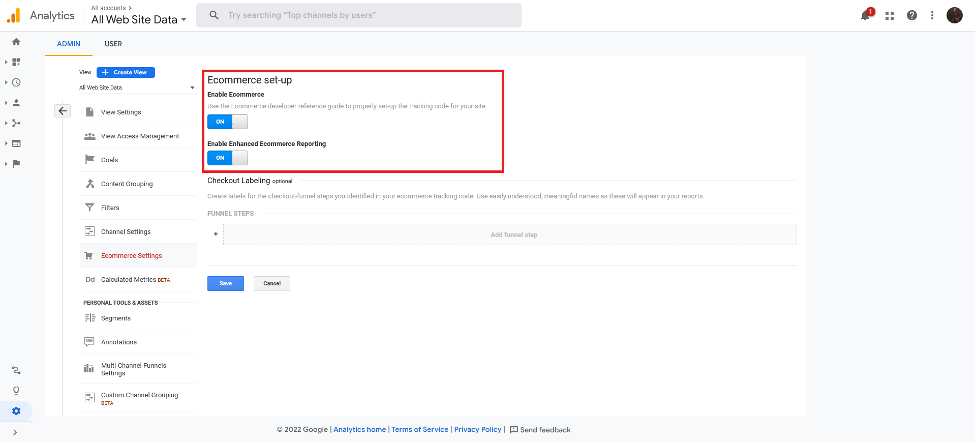
On the next page, toggle enable ecommerce and enhanced ecommerce reporting on. Once done, click save.
Step 4: Set up WooCommerce Google Analytics plugin settings
Now, it’s time to set up your tracking options inside WooCommerce. Let’s explore each of the settings and what they do.
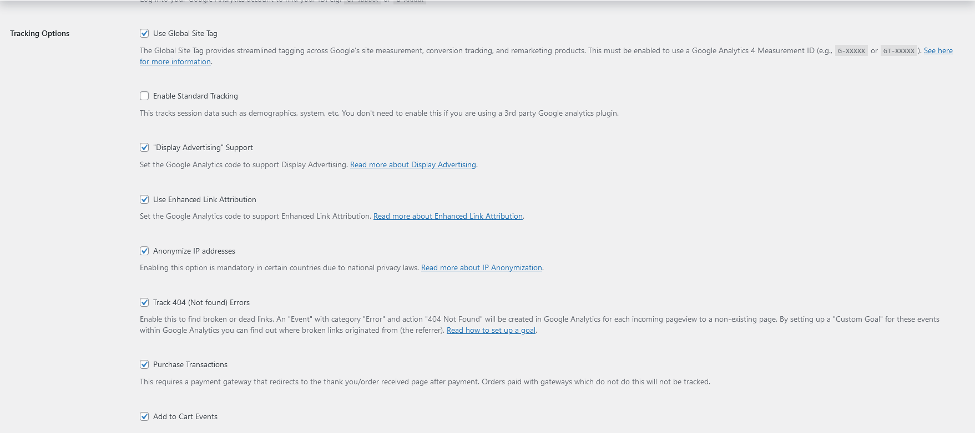
- Google Analytics Tracking ID — Here’s where you add your Google Analytics Measurement ID. This unique code links your Google Analytics account to your WooCommerce website.
- Global Site Tracking — This setting option optimizes your Google Analytics data across all Google tracking products. Keep this option enabled to enjoy the benefits of Google Analytics 4 Measurement.
- Universal Analytics — Enabling this option keeps your analytics compatible with the older version of the Google Analytics program. If you check the Use Global Site Tracking option, this preference won’t be visible.
- Purchase Transactions — You can track revenue, tax, refunds, shipping costs, and other transactions once you integrate a payment gateway like PayPal or Square.
- Add to Cart Events — This option helps track when customers add a product to their cart.
- Enable Enhanced Ecommerce — You can use this function if the Use Global Site Tracking and Enable Universal Analytics are enabled on your Google Analytics account.
- “Display Advertising” Support — Click on this check box if you want to run ads on the Google Display Network and track them in your analytics account.
- Anonymize IP Addresses — Click this checkbox to offer more security and privacy to your customers, especially if it is legally required in your location or region.
- Track 404 Errors — Selecting this option helps you find dead links in your content. Once enabled, you can find, view, and manage broken links in your Google Analytics account under the Behavior > Events > Overview > Error section.
- Enable Standard Tracking — Choose this option if Google Analytics WooCommerce is the only analytics plugin on your website. Leave it unchecked if you use a different Google Analytics plugin like MonsterInsights.
So how do you know if your analytics add-on is actually working?
Testing your analytics
There are several ways you can test if your Google Analytics is working on your WordPress site, including:
Check if page views are firing in real-time in Google Analytics
You can run real-time tests on your websites to see how many people are live at any moment.
To do this, check your Google Analytics dashboard and click on realtime.
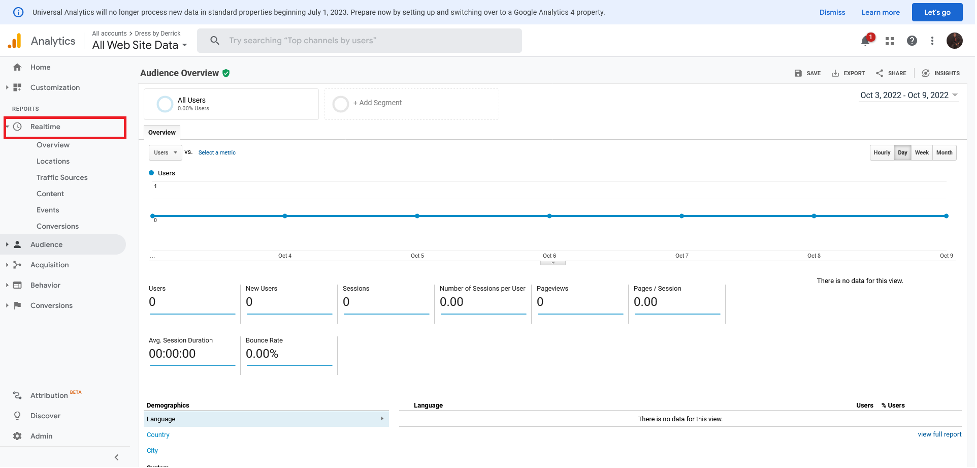
Most of your tracking issues will come from specific subdomains. Real-time reporting on Google Analytics will help you gauge individual user activity on your website.
Use Google Tag Manager
Google Tag Manager is another free tool offered by Google to help ensure all your tracking scripts are firing from one place. You can use the Tag Manager to test if Google’s ecommerce analytics software tracks user events and actions on your website.
Other considerations
Sometimes your Google Analytics account or tracking code may not be the problem. Here are other things you might want to look out for:
- Ad blockers often block tracking scripts. If you’re running an ad blocker on your browser, turn it off or use a different browser.
- Ensure no page has multiple tracking codes.
- Log out from your GA account if you want to track your own actions.
Once you integrate Google Analytics into your WooCommerce website, you can track other key metrics and improve the performance of your website. Also, remember to adhere to the privacy policy requirements of your region.
Final thoughts: How to add Google Analytics to WooCommerce
Following these steps will get you up to speed on integrating Google Analytics into your WooCommerce store.
You can now gain valuable insights into your customers’ behavior, enabling you to enhance your store’s overall performance. Once you begin combing through this newfound data, you’ll wonder why you didn’t integrate it sooner.
Ready to take your business to the next level? Check out the Nexcess fully managed WordPress hosting package. We manage your WooCommerce website as you focus on growing and scaling your business to new heights.
Check out our plans to get started today.
This blog was originally published in July 2021. It has since been updated for accuracy and comprehensiveness.

